DIY: TheRetrofitSource/Morimoto Retro-Quik Install in FR-S
Mods - I know this is kind of a half assed DIY. It was over 100* when
I did this and the bugs were outrageous, so I just wanted to get it
done. There are some parts that I didnt get a picture of, but I will do
my best to explain it. If in the future I am able to get pictures, I
will update this DIY.
**BEFORE YOU BEGIN, PLEASE BE AWARE THAT I AM IN NO WAY, SHAPE, OR FORM RESPONSIBLE FOR ANY DAMAGE TO YOURSELF, YOUR VEHICLE, YOUR PRIDE, OR YOUR NEIGHBORS BEST-FRIENDS UNCLES CAT. PROCEED AT YOUR OWN RISK**
All pictures are thumbnails, click for the large version.
So the guys at TRS got us a great retro kit using Morimoto Mini-H1 bixenon projectors, Morimoto 3five 35W ballasts, Morimoto bulbs, a relay harness, and of course the appropriate brackets.
On a scale of 1-10, I'd say the difficulty is about a 6, but that all depends on your comfort level as you do have to bake the headlights to take them apart.
Tools needed:
-Socket wrench
-10mm and 12mm socket
-7mm or 9/32" deep well socket
-Socket extension
-A few flat head screwdrivers
-Phillips head screwdriver
-Utility knife
-Scissors
-Oven
-Gloves (the headlight will be hot when you take it out of the oven)
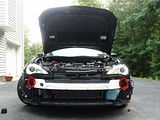
I did the install yesterday in about 3 hours, and most of that time was spent taking the car apart. @DarrenDriven has a great DIY for blacking out his headlights, which has a step by step process for removing the lights from the vehicle and baking them. Theres no need for me to reiterate his instructions, so just refer to steps 1-20 in his DIY, take your time, Ill wait
http://www.ft86club.com/forums/showthread.php?t=8788
OK, now that you've got the headlights apart, you should see this:
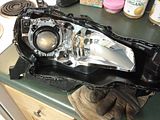
There are four screws holding the stock projector to the headlight basket. Remove those screws and set them aside as we will be reusing them.

You should now see this:
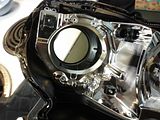
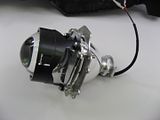
Now its time to attach the new TRS brackets to the new projectors. You'll have a bag with some hardware in it. There will be four screws, four lock nuts, and four spacer/nuts used on each projector.
Thread the screws through the holes on the projector, then put the spacer/nuts onto them. Dont tighten them down, as that will make the next step difficult. Slide the bracket onto the projector. The narrow end of the bracket faces down (it should be on the same side of the projector as the solenoid). Once you have the bracket on, now you can tighten those spacer/nuts. Once thats done, thread the lock nuts onto each screw and tighten. You should end up with this (courtesy The Retrofit Source, as I forgot to take a picture here):
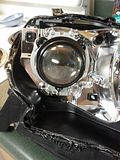
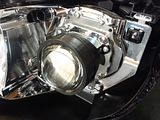
Now its time to put the projector into the basket. The solenoid should be on the bottom of the light. Make sure the highbeam wires are sticking out the rear of the headlight. Reinstall the screws and tighten. You dont need to wrench on it, just snug it down.
Now its time to close up the headlights. Refer to steps 27-28 in Darrens DIY thread.
Now that the lights are sealed back up, its time to reinstall them in the car, right? NO! We have a few more things to take care of.
First up, lets route that relay harness. Thanks to TRS, the harness is made to fit our car. The harness primarily lives on the passenger side of the car, with only one plug running to the driver side. I decided to mount the relays right behind the DRL relay behind the bumper. A 10mm socket is required for that bolt.
You will see a total of five plugs coming off of the relay harness. One is for power (it has an inline fuse), one is ground, two go to the new HID ballasts, and one is the input from the stock lowbeam connector (that one will have an adapter plugged into it).
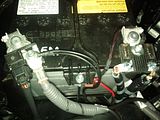
I routed power and ground under the fuse box and wire harness, and up to the battery.
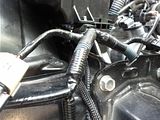
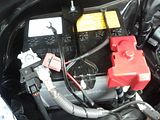
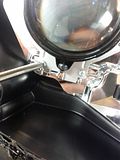
To make the connections at the battery, you'll need the 12mm socket. You can see in this picture where I connected the wires. I didn't want to use the two fused connections, as that may overload the fuse that are there. So I went for the big 12mm lug right at the top. I routed the power wire around the terminal, that way I can still reinstall the red plastic cover. I used the 12mm lug on the ground terminal as well.
Next, grab the stock low beam connector and connect it to the adapter on the relay harness:
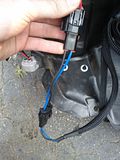
You should be left with two connectors now, one for each ballast. I routed the longest cable across the bumper bar and over to the passenger side.
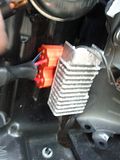
Now its time to figure out where to mount the ballasts. Toyota/Subaru was nice enough to leave a hole right on the front frame rail that is perfect to use for the ballast. Just attach the supplied bracket to the ballasts and use the supplied bolt, lock washer, and nut to fasten it. Unfortunately, it was quite late when I did this and couldnt get a picture of it. But, to give you an idea of where to look, I've circled the areas in red:
Now that thats out of the way, lets move on to finishing up the headlights and getting them ready to install. You'll need the rubber caps, the HID bulbs, and the little bag of parts that was in each of the projector boxes - specifically the male plug connector, the two grommets, and the bulb holder spring.
First, clean off the bulb using some alcohol prep pads. My kit didn't include any, but luckily I still had a box laying around from previous retros. Wipe down the bulb and the brown wire. Place the bulb in the projector, and install the spring. I like to use pliers to secure the spring since it is under a bit of tension. You want the spring to curve towards the bulb, not away from it.
Next, pass the power and ground wires through the grommet that the HID bulb wires pass through. Then put the tiny grommets supplied with the kit on each wire with the fat side closer to the bulb.
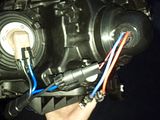
Take a look at the stock highbeam connector to see which side of the new connector is ground (black wire), then stick the wire into that slot in the connector. It doesnt take much for it to click into place. Do the same for the red wire. Then push the grommets down into the connector to form a nice seal.
Next up, cut a hole in the rubber cap. The grommet will sandwhich the rubber cap, creating a seal, so the hole needs to be smaller the size of the grommet. Ideally, you'll want the hole to be the size of a quarter. You should now be left with this:
I used the highbeam splitter, but that is optional. You could choose to use the splitter, giving you both a halogen and HID high beam, you could connect the high beam directly to the projector to have just an HID high beam, or you could just connect it like stock to only use the halogen high beam.
Now its time to reinstall the headlights. Then connect the two wires from each ballast to the two wires on each bulb. Connect the factory high beam connector to whichever high beam you chose to use.
You should have one factory connector that is not being used - the driver side low beam wire. I tape up the end of that connector to protect it from dirt/water. Zip tie and loose wires, and reinstall the bumper.
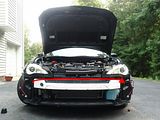
Once you are done, turn on the headlights and enjoy being able to see:

**BEFORE YOU BEGIN, PLEASE BE AWARE THAT I AM IN NO WAY, SHAPE, OR FORM RESPONSIBLE FOR ANY DAMAGE TO YOURSELF, YOUR VEHICLE, YOUR PRIDE, OR YOUR NEIGHBORS BEST-FRIENDS UNCLES CAT. PROCEED AT YOUR OWN RISK**
All pictures are thumbnails, click for the large version.
So the guys at TRS got us a great retro kit using Morimoto Mini-H1 bixenon projectors, Morimoto 3five 35W ballasts, Morimoto bulbs, a relay harness, and of course the appropriate brackets.
On a scale of 1-10, I'd say the difficulty is about a 6, but that all depends on your comfort level as you do have to bake the headlights to take them apart.
Tools needed:
-Socket wrench
-10mm and 12mm socket
-7mm or 9/32" deep well socket
-Socket extension
-A few flat head screwdrivers
-Phillips head screwdriver
-Utility knife
-Scissors
-Oven
-Gloves (the headlight will be hot when you take it out of the oven)
I did the install yesterday in about 3 hours, and most of that time was spent taking the car apart. @DarrenDriven has a great DIY for blacking out his headlights, which has a step by step process for removing the lights from the vehicle and baking them. Theres no need for me to reiterate his instructions, so just refer to steps 1-20 in his DIY, take your time, Ill wait
http://www.ft86club.com/forums/showthread.php?t=8788
OK, now that you've got the headlights apart, you should see this:


There are four screws holding the stock projector to the headlight basket. Remove those screws and set them aside as we will be reusing them.


You should now see this:

Now its time to attach the new TRS brackets to the new projectors. You'll have a bag with some hardware in it. There will be four screws, four lock nuts, and four spacer/nuts used on each projector.
Thread the screws through the holes on the projector, then put the spacer/nuts onto them. Dont tighten them down, as that will make the next step difficult. Slide the bracket onto the projector. The narrow end of the bracket faces down (it should be on the same side of the projector as the solenoid). Once you have the bracket on, now you can tighten those spacer/nuts. Once thats done, thread the lock nuts onto each screw and tighten. You should end up with this (courtesy The Retrofit Source, as I forgot to take a picture here):

Now its time to put the projector into the basket. The solenoid should be on the bottom of the light. Make sure the highbeam wires are sticking out the rear of the headlight. Reinstall the screws and tighten. You dont need to wrench on it, just snug it down.

Now its time to close up the headlights. Refer to steps 27-28 in Darrens DIY thread.
Now that the lights are sealed back up, its time to reinstall them in the car, right? NO! We have a few more things to take care of.
First up, lets route that relay harness. Thanks to TRS, the harness is made to fit our car. The harness primarily lives on the passenger side of the car, with only one plug running to the driver side. I decided to mount the relays right behind the DRL relay behind the bumper. A 10mm socket is required for that bolt.

You will see a total of five plugs coming off of the relay harness. One is for power (it has an inline fuse), one is ground, two go to the new HID ballasts, and one is the input from the stock lowbeam connector (that one will have an adapter plugged into it).
I routed power and ground under the fuse box and wire harness, and up to the battery.


To make the connections at the battery, you'll need the 12mm socket. You can see in this picture where I connected the wires. I didn't want to use the two fused connections, as that may overload the fuse that are there. So I went for the big 12mm lug right at the top. I routed the power wire around the terminal, that way I can still reinstall the red plastic cover. I used the 12mm lug on the ground terminal as well.

Next, grab the stock low beam connector and connect it to the adapter on the relay harness:

You should be left with two connectors now, one for each ballast. I routed the longest cable across the bumper bar and over to the passenger side.

Now its time to figure out where to mount the ballasts. Toyota/Subaru was nice enough to leave a hole right on the front frame rail that is perfect to use for the ballast. Just attach the supplied bracket to the ballasts and use the supplied bolt, lock washer, and nut to fasten it. Unfortunately, it was quite late when I did this and couldnt get a picture of it. But, to give you an idea of where to look, I've circled the areas in red:

Now that thats out of the way, lets move on to finishing up the headlights and getting them ready to install. You'll need the rubber caps, the HID bulbs, and the little bag of parts that was in each of the projector boxes - specifically the male plug connector, the two grommets, and the bulb holder spring.
First, clean off the bulb using some alcohol prep pads. My kit didn't include any, but luckily I still had a box laying around from previous retros. Wipe down the bulb and the brown wire. Place the bulb in the projector, and install the spring. I like to use pliers to secure the spring since it is under a bit of tension. You want the spring to curve towards the bulb, not away from it.
Next, pass the power and ground wires through the grommet that the HID bulb wires pass through. Then put the tiny grommets supplied with the kit on each wire with the fat side closer to the bulb.
Take a look at the stock highbeam connector to see which side of the new connector is ground (black wire), then stick the wire into that slot in the connector. It doesnt take much for it to click into place. Do the same for the red wire. Then push the grommets down into the connector to form a nice seal.
Next up, cut a hole in the rubber cap. The grommet will sandwhich the rubber cap, creating a seal, so the hole needs to be smaller the size of the grommet. Ideally, you'll want the hole to be the size of a quarter. You should now be left with this:

I used the highbeam splitter, but that is optional. You could choose to use the splitter, giving you both a halogen and HID high beam, you could connect the high beam directly to the projector to have just an HID high beam, or you could just connect it like stock to only use the halogen high beam.
Now its time to reinstall the headlights. Then connect the two wires from each ballast to the two wires on each bulb. Connect the factory high beam connector to whichever high beam you chose to use.
You should have one factory connector that is not being used - the driver side low beam wire. I tape up the end of that connector to protect it from dirt/water. Zip tie and loose wires, and reinstall the bumper.
Once you are done, turn on the headlights and enjoy being able to see:

hi
ReplyDeletedo you know the size of the original projector (and lens)?
thanks